

Camping out is great until the rock jabs you in the side or…
You’ve set up the tent in just the right spot. The warm sun beams down on you. Everything seems right with the world. You take it all in with the family and enjoy the day. The sun sinks past the horizon and its time to turn in. You wake around 2 am with a sharp pain in your back.
You grab your flashlight and discover your air mattress is flat and yesterday’s early edition. A rock from the ground has been poking you in the small of your back for hours.
 So, you’ve fallen victim to one of the common problems in camping today. It’s not bears, rain, and mosquitoes. It’s a mattress with a hole in it.
The average camper isn’t prepared to deal with this fact of life usually. But after today you’ll be a savvy camper and upon the tricks needed to get the hole patched and then you can rest comfortably during the rest of your outing and not worry about getting a good night’s sleep.
If you use an air mattress in the home instead of a traditional mattress, waterbed, and futon, what you will learn will work for your home air mattress as well.
We have a number of solutions that work then it’s up to you to use the one that works best for your hole problem.
Table of Contents
How To Patch An Air Mattress With 3 Ways That Are Quick And Easy
Before we begin, there are a few things you’ll want to have ready
Before you can fix a hole, you will need some items that will make things go a whole lot easier.
- A cigarette lighter
- One or more glue sticks, which you can buy at most hobby or home service centers
- An inflator for your particular air mattress
- A small Spray Bottle
- A small soft sponge
- A teaspoon or so of dish soap
- A piece of fine-grit sandpaper
- Roll of masking tape
- A permanent marker
- Needle
- Yarn
- A pair of rubber gloves
- A pair of pliers
- Air mattress repair kit
Depending on the method, you’ll not require all of the above to plug that pesky leak. You can choose the materials you need according to the size of the leak and what you have available at the time.
A Prepper should have a kit already made up in advance, knowing that an air mattress will eventually spring a leak sooner or later. So, being prepared is always your best choice.
Now let’s look at 3 different ways you can get the job done:
To Plug A Leak You Need To Find The Leak
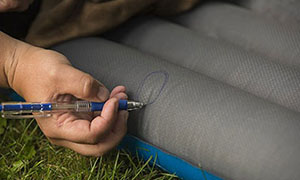 The first thing we need to do before plugging a hole in your air mattress is to find it. Once it’s found, you mark it with a permanent marker or a piece of masking tape.
- The easiest method to find the leak is to inflate the mattress first.
- Put a teaspoon of dish soap into a spray bottle and Splurch it over your mattress and wipe it around with a soft moist sponge.
- When the soapy water encounters a hole, you will see a stream of bubbles. Carefully dry that spot and mark it with your marker or the masking tape.
- Hang the mattress out to dry thoroughly before attempting to repair the hole.
You are now ready to decide on which patching method you will use.
#1 The Glue Stick Approach
This is probably the fastest way to plug a leak at least temporarily.
Get out your lighter and if you don’t smoke, take one with you when you go camping or have one in the house just in case. The fire has been one of man’s greatest friends and deadliest enemies as well.
- Take out your glue stick and use the lighter to melt the tip of it.
- Rub the tip over the hole and let the glue harden.
- You now have a plug that will keep the air inside until you get home or decide to plug the leak more permanently.
If you want to do a better job we will ratchet things up a notch.
#2 The Glue And Yarn Approach
This method is a bit trickier and if you fumble it, you might end up with a bigger hole as a result.
- You first put on a pair of rubber gloves as a start.
- Take a piece of yarn and soak it in your favorite glue. Rhino Glue is a good fast-setting glue so you have to hurry a bit before it sets.
- Carefully use a needle to insert a loop of yarn into the hole and then add a dollop of glue of top of that.
- Using your pliers mash the yarn and glue mixture tightly in place until it is set.
- Release the pressure and let the glue dry completely.
The hole is now plugged and an airtight seal is now in place.
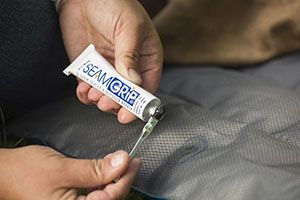
#3 The Patch Kit Approach
This is the more preferred method short of replacing your air mattress.
Select your patch kit from the plethora available up on Amazon.
- Deflate your mattress
- Prep the site with your sandpaper in an area larger than the hole.
- Next, cut a piece of the patch material or select a precut patch that is slightly larger than the hole.
- Apply glue to both patches, prepared area, and let dry a bit.
- Apply some fresh glue to the patch and place it over the hole.
- Lastly, put a book or an iron on the patch to weigh it down tight over the hole.
- Wait until the patch and glue cure completely before re-inflating and checking your work.
If you’ve done everything, right. You should have a patch job that is stronger than the original mattress material.
Final thoughts
Camping is one of the fastest-growing pastimes in America today and air mattresses make the fun even better. You are off the cold ground and you have comfort that is comparable to your bed at home. However, a good camper knows not everything goes right all the time. That’s why they are ready for emergencies.
First Aid kits, emergency lights, map, a knife, and a means to make fire are all part of the kit and caboodle that a savvy camper takes along just in case. You should add some form of patch kit to your camping loadout list and you’ll never be caught waking up to a rock poking you in your fundament on a cold morning at your favorite campsite.
You now know how to find a hole and then have 3 separate ways of fixing the problem.
From then on is a clear sail and you can go back to enjoying your outing instead of grousing and hating the whole experience.
Camping is meant to be fun. With a bit of prior planning, it will live up to that ideal in spades.